Pages

2.28.2011

Jewelry

I was so excited to receive this canvas 80-pocket hanging jewelry organizer in the mail this past week. I ordered it online from The Storage Store. Now I can see all of my jewelry in one place rather than having all of my ear rings and bracelets strung across my room and bathroom.


For my necklaces and longer jewelry I covered a cork board to hang just inside my closet.
To make your own cork board jewelry organizer you will need:

a simple cork board
material to cover the board
glue
butter knife
ribbon
decorative pins (upholstery pins work well for a larger board)
tacks or pins to hang jewelry from

For this project, I used these pearl tip pins and clipped them shorter with wire cutters.

Cut the material just larger than the size needed to cover the cork board. Start along one side and tuck the material under the frame of the cork board with a butter knife until the material is completely tucked in around the entire cork board.

Measure along the sides of the board and make a small mark with a pencil where the ribbon should touch the edge of the board. Cut the ribbon to be the right lengths and put them over the board in place so it is crisscrossed like this:

Use the butter knife to tuck the edges of the ribbon under the frame and place a pin through the ribbon where it crosses. Place a bead of glue around the entire frame once finished to hold the material and ribbon in place (Tacky glue or Elmer's glue works fine).

Insert pins along the top of the board and hang your jewelry!

2.24.2011

Bed Pillows

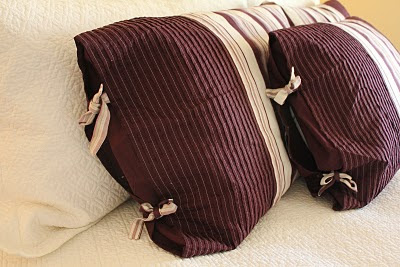
Last fall we had a really nice bed spread and pillows on our bed that we got for our wedding. I decided we needed a more "baby-friendly" bed spread and pillows that could easily be thrown in the washer. I didn't want to spend a lot of money, so I purchased these DKNY pillowcases on clearance at Bed Bath and Beyond.

I really liked the ties on the side of the pillows. Unfortunately, the front pillow above did not come with these cute ties on BOTH sides...
It came like this (below). Since the pillowcases were such a bargain, I bought 3 extras (a total of 8). I used one of the extra pillows to cut off the solid colored side of the pillow with the ties and sew it to the end of another pillowcase to make a more symmetrical look for the front pillow.
And this is how it turned out:
I used the remainder of the cut pillowcase and the 2 extra pillowcases to place over pillows I already had to put by the window in our bedroom. The pillow covers came together nicely for just under $40.
Check out the clearance section of your favorite bedding store, you'll be surprised what you can find!!

2.17.2011

New Shoes

Now that my baby is nearly one I've decided it's time to get back to running! So this last week I went to my favorite running store and purchased the updated model of my all-time favorite running shoes (Nike New Balance 759 trail-running shoes to be exact). I love them! Thank-you Nike New Balance for spoiling my feet with extreme comfort. Time to re-vamp the running mix on my iPod and make a running schedule - Half Marathon here I come!

2.13.2011

Valentine's Day Pinwheels

This is a really simple and inexpensive way to decorate for Valentine's Day. It is also a craft that kids will enjoy.


To make these pinwheels, I followed the directions here. Some of my paper had patterns on both sides and some only had a pattern on one side. I glued two of the one-sided papers together so there would be a pattern on both sides before starting. I used a hot glue gun to hold the pieces in place and added a button to the center. I used a simple thin wooden dowel to support the pinwheel to look like a flower then placed them in a vase.

These would also be fun to make in summer colors, for a birthday party or even the 4th of July!

2.11.2011

Chicken Chili

Here's a delicious soup recipe for you to try. I loved this soup so much when someone made it for me that I asked them for the recipe. Every time I have made this for anyone, they have asked me for the recipe. So I thought I'd pass it along, because I know you are going to want to try this recipe!

Chicken Chili

1 large onion, chopped
2 cloves garlic, minced
1 tsp. oil
1 tsp. cumin
½ tsp. black pepper
½ tsp. red pepper
2 cups cooked chicken, cubed (or 1 can chicken)
3 cans white beans, 15 oz.
1 can whole kernel corn, 15 oz.
1 can green chilies, 7 oz.
1 can diced tomatoes, 15 oz.
2 tsp. chicken bouillon, or 4 cubes
green onion, chopped
sour cream
grated cheese

In frying pan saute onion, garlic, oil, cumin, black and red pepper. In large crock pot add all beans, corn chilies, tomatoes, bouillon, chicken and onion mixture from frying pan (including liquids in all cans). Heat, then simmer for about an hour.

Serve with chopped green onions, sour cream and grated cheese.

2.09.2011

Under the Bathroom Sink

Last night I finally stopped at Wal-Mart and purchased some lovely plastic drawers so I could organize under the bathroom sink. I dusted off the label maker to make a few labels and organized it like this:


Now when my husband says, "Honey, do you have any extra toothpaste?" instead of rummaging through a pile of hygiene products and toiletries I can say, "Yes Dear, it's under the bathroom sink" and he knows exactly where to look. Next project... organizing jewelry. Happy organizing!

2.07.2011

Valentine's Day Garland

I love Valentine's Day! To help make our house a little more "LOVE"ly this year I made this simple garland. It really is simple - just follow the directions below:

Materials you will need:

1/4 yard Valentine's Day print material in 3 or 4 different patterns
1 spool 3/8" ribbon
batting
scissors
sewing machine
glue gun
buttons (optional)

Choose fabric in different Valentine's Day patterns at your local craft store - I went to JoAnn's and chose 4 patterns (1/4 yard each). You can't see it in the picture, but there are little sparkles in this fabric!

Trace a heart on a piece of paper the size you would like to make each heart (I made a total of 9 hearts, 5 inches long across the top of each heart). Fold your fabric "wrong-sides" together and pin the paper to the fabric going through both sides of fabric. Cut along the paper and repeat for each additional heart.

Since the fabrics are already lined up correctly, just sew around the outside of the heart, leaving a little gap open to stuff with batting. Once filled (not too full) sew the open hole closed. I'm sure there is a better way to attach the hearts, but I just used a glue gun.

Carefully glue each heart together until you have a chain of hearts. Tie enough small ribbon bows to place between each heart with the glue gun. I also glued buttons to a few of the hearts to spice it up a little. Attach a 10-12 inch ribbon to each end and wallah... you have cute heart garland to add to your fireplace!

I had enough fabric left over to make these matching hearts to hang from the china cabinets, too.
Happy Valentine's Day!